The single biggest reason Canadian cannabis seedlings die in weeks one through three has nothing to do with genetics , it's overwatering. Growers drown young root systems before they ever have a chance to establish, then blame the seed. The fix is simple once you know the numbers: 200 to 400 PPFD of light, watering only when the top centimetre of medium is dry, temperatures held between 22 and 26°C, and relative humidity sitting at 65 to 70%. Get those four dials right, and seedling failures drop dramatically. This guide breaks down every variable, week by week, so you know exactly what to watch in the most fragile window of any cannabis grow.
- ✓ First-time Canadian growers starting from seed
- ✓ Indoor growers struggling with seedling die-off
- ✓ Outdoor growers hardening off starts in spring
- ✓ Anyone growing autoflower or feminized seeds
- ✓ Growers in Zones 3, 7 starting seeds indoors before transplant
- ✗ Growers past the week-3 vegetative stage
- ✗ Clone-based grows (no germination phase)
- ✗ Growers looking for strain recommendations (see our full seed catalogue)
Cannabis seedlings in weeks 1, 3 thrive under 18 hours of light at 200, 400 PPFD, temperatures of 22, 26°C, humidity of 65, 70%, and watering only when the top 1 cm of medium dries out. These targets apply equally to autoflowering seeds and feminized photoperiod seeds.
What is the cannabis seedling stage?
The seedling stage is the growth phase from the moment a sprout emerges from soil until the plant has developed 3 to 5 sets of true fan leaves , roughly weeks 1 through 3 after germination.
During this window, the root system is shallow and the plant has almost no nutritional reserves. The cotyledons (the small round starter leaves) supply the first energy, while the taproot searches for moisture and oxygen in the medium below.
Per Health Canada regulations, Canadian adults (19+ in most provinces, 18+ in Alberta, 21+ in Québec) may cultivate up to 4 plants per household. Those 4 plants all pass through this seedling window , and how you manage it determines the ceiling of your entire grow.
The seedling stage is the highest-leverage phase of any cannabis grow. Three weeks of correct temperature, humidity, light, and watering creates the foundation for every gram you'll harvest. Rush it or neglect the environmental numbers, and you'll spend the rest of the grow compensating for weak roots.
Week 1: Emergence and fragile first roots
In week 1, the seedling has just emerged from the medium. The cotyledons are fully open, the taproot is extending downward, and the first set of true serrated leaves may just be visible by day 6 or 7.
The root zone is tiny , typically only 2 to 4 cm deep. This is the most common moment for overwatering. The medium holds far more moisture than a seedling this small can consume, so water gathers around delicate root tips and starves them of oxygen.
Key targets for week 1:
- Temperature: 22, 26°C (day), no lower than 18°C (night)
- Humidity: 65, 70% RH
- Light: 18/6 schedule, 200, 250 PPFD, light source 50, 60 cm above canopy
- Watering: small circle of water around the base only, every 2, 3 days
- Nutrients: none , cotyledons and starter mix supply everything needed
A humidity dome over the seedling helps Canadian growers dramatically, particularly in winter when indoor air is dried by heating systems. Breeder documentation consistently shows seedlings under 65% RH establish more slowly than those kept humid, because the plant transpires through leaves before its roots are ready to keep up.
Week 1 is a watch-and-wait phase. The single most productive thing you can do is resist the urge to water, feed, or adjust lights unnecessarily. Check conditions, log your temperature and RH twice daily, and let the seedling work.
Week 2: First true leaves and where most growers go wrong
Week 2 is when the first true fan leaves fully unfurl and the plant starts photosynthesising at a meaningful rate. Growth visibly accelerates , you may see 1 to 2 cm of new height per day by day 12 or 13.
This is also where most growers under-water or over-water in the same run. Under-watering shows as drooping fan leaves that don't perk back up. Over-watering shows as yellowing lower cotyledons, a soggy medium smell, and leaves that curl downward at the edges.
Light intensity can increase slightly in week 2 , target 250 to 350 PPFD. If you're using a full-spectrum LED, this typically means keeping the fixture 45 to 55 cm above canopy. Raise it if leaf edges look bleached or tacoed (curling upward).
If you're growing autoflower seeds, note that autoflowers are already aging into their genetic flowering countdown from day 1 , week 2 is not the time to stress them with repotting or environmental swings.
Week 2 rewards patient growers. Bump light gradually, water by lifting the pot to gauge weight, and hold off on nutrients for at least another 5 to 7 days. First-time growers who introduce nutrients in week 2 almost always cause minor nutrient burn that stalls growth for 4 to 7 days.
Week 3: Transition to vegetative growth
By week 3, the seedling should have 3 to 5 sets of serrated fan leaves and a clearly visible main stem with internode spacing developing. The root zone has likely reached the walls of a solo cup or a small starter pot.
This is the transition point into true vegetative growth. Light intensity can now move toward 400 PPFD. If you started in a solo cup, week 3 is usually the right time to transplant into a final container (for photoperiod plants) or a 7 to 11 L fabric pot (for autoflowers).
A light vegetative nutrient feed (EC around 0.6 to 0.8 mS/cm) can be introduced at the tail end of week 3 if the plant is healthy and the starter medium has been in use for 18+ days. Don't start nutrients if the plant shows any stress signs , resolve the root cause first.
Week 3 is the payoff for weeks 1 and 2 done well. A healthy seedling entering veg has dark green leaves, a firm upright stem, and visible root tips just touching the container walls. If yours looks like that, you've cleared the hardest window of the grow.
What light schedule and intensity do cannabis seedlings need?
Cannabis seedlings need an 18/6 light schedule (18 hours on, 6 hours off) and light intensity between 200 and 400 PPFD throughout weeks 1, 3. This applies to both photoperiod and autoflower genetics.
Too much intensity causes light stress before the plant's protective systems are developed. Published grower journals and breeder documentation consistently show 200, 250 PPFD in week 1 scaling to 350, 400 PPFD by week 3 produces the most even development.
Full-spectrum LEDs running at 30 to 40% power (depending on fixture wattage) typically hit this range. Measure at canopy height with a PAR meter if available , or keep a budget LED 50 to 60 cm above canopy as a starting point and adjust based on leaf response.
| Week | PPFD Target | Light Height (LED) | Schedule | Risk if Too High |
|---|---|---|---|---|
| Week 1 | 200, 250 μmol/m²/s | 55, 65 cm | 18/6 | Leaf taco, bleaching |
| Week 2 | 250, 350 μmol/m²/s | 45, 55 cm | 18/6 | Light stress, slowed root growth |
| Week 3 | 350, 400 μmol/m²/s | 40, 50 cm | 18/6 | Internode compression, leaf curl |
If you have no PAR meter, err on the side of too little light rather than too much during weeks 1, 3. A seedling that's slightly light-hungry grows slowly but recovers fast. A seedling that's been light-stressed takes 5 to 10 days to recover , time you can't get back on a short Canadian season.
How do you water cannabis seedlings correctly?
Water seedlings only when the top 1 cm of medium is dry to the touch , or when the pot feels noticeably lighter than right after watering. For most setups, that means every 2 to 3 days in weeks 1, 2, extending slightly as the root zone grows.
Step 1: Check the medium before every watering
Press your finger 1 cm into the medium at the edge of the pot (not directly over the stem). If it feels damp, wait 24 hours and check again. Only water when it's dry at that depth.
Step 2: Lift the pot to confirm
A saturated pot feels dramatically heavier than a dry one. This "pot lift" technique is more reliable than visual checks, especially with dark-coloured fabric pots. Pick it up right after watering to memorize the "wet" weight , then lift again before your next scheduled watering.
Step 3: Water in a small ring around the stem
Apply water in a circle roughly 3 to 5 cm from the stem base. This encourages roots to stretch outward searching for moisture rather than staying compressed under the stem. Use pH-adjusted water: 6.0 to 6.5 for soil, 5.8 to 6.2 for coco coir.
Step 4: Aim for no runoff in week 1, light runoff from week 2
In week 1, give only 30 to 60 mL per watering , enough to wet the immediate root zone without saturating the whole pot. From week 2 onward, you can water until 10 to 15% runoff appears at the base, then stop immediately.
Looking at the questions our support team fields most often, overwatering is mentioned in the majority of seedling failure reports. The fix is always the same: wait longer between waterings and give less volume per session than feels instinctively right.
Common cannabis seedling problems and how to fix them
Most seedling problems in weeks 1, 3 fall into five categories. Each has a distinct visual signature that makes diagnosis straightforward once you know what to look for.
| Problem | Visual Signs | Root Cause | Fix |
|---|---|---|---|
| Damping off | Stem collapses at soil line | Fungal, overwatering + low airflow | Improve drainage, add gentle fan, reduce watering |
| Overwatering | Leaves curl down, yellowing cotyledons | Root zone oxygen depletion | Wait 3, 4 days before next watering |
| Light stress | Leaf taco, bleached tips | PPFD too high for seedling stage | Raise light fixture 10, 15 cm |
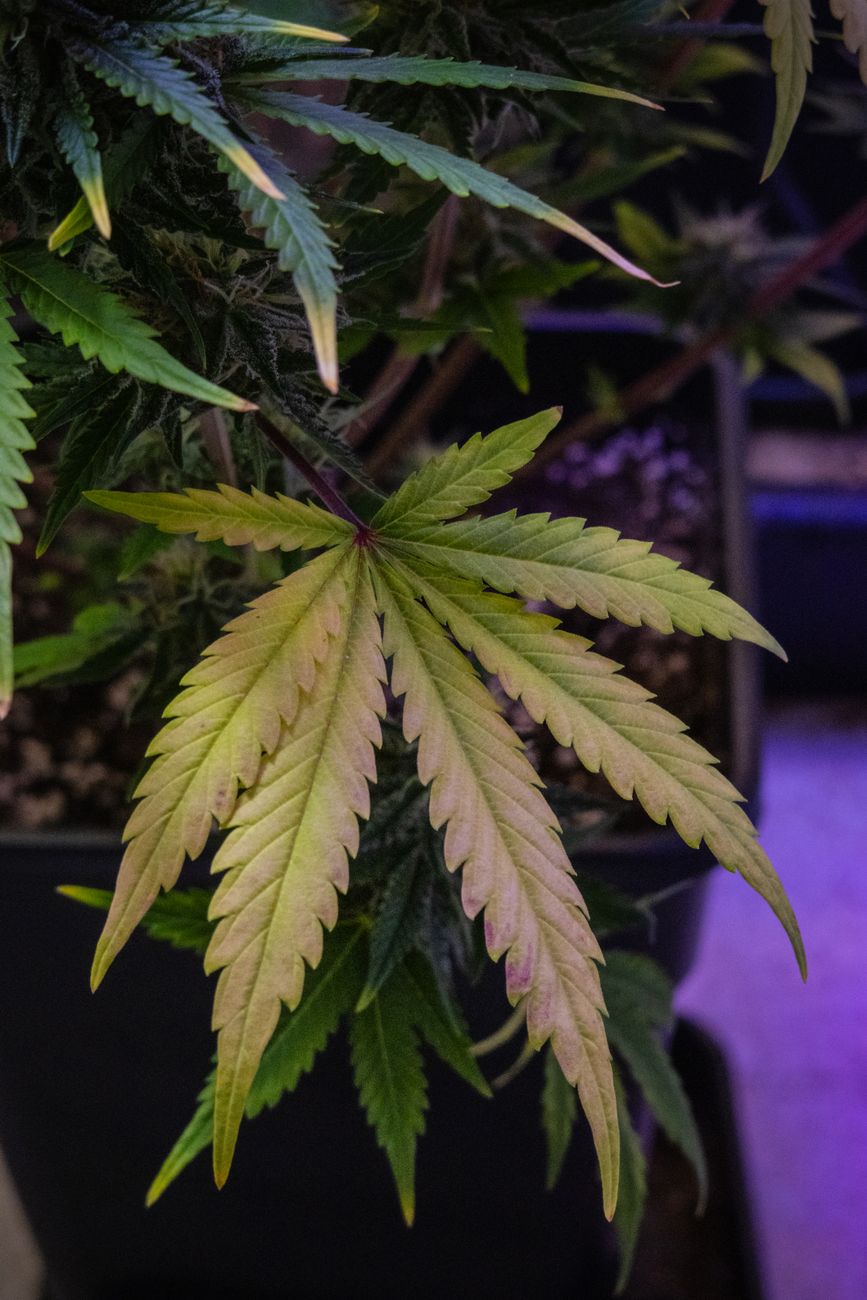
| Nutrient burn | Brown/crispy leaf tips | Fed too early or too strong | Flush with pH water, hold nutrients until week 3+ |
| Stretching (etiolation) | Tall thin stem, wide internodes | PPFD too low or light too far | Lower fixture, bury stretched stem when transplanting |
"If your seedling problem starts at the leaf tips, check light and nutrients. If it starts at the stem or medium level, check water and airflow. The location of the symptom tells you the source of the problem."
Formula: Tip symptoms = aerial environment (light, VPD, nutrients). Base/stem symptoms = root environment (water, oxygen, fungal). Resolve the zone that's showing symptoms first.
Damping off is the only seedling problem that can't be reversed once it takes hold , but it's entirely preventable. Gentle oscillating airflow, correct watering intervals, and a well-draining medium eliminate it almost completely. For strong genetics that resist early stress, feminized cannabis seeds from established breeders start with vigorous taproots that give you a meaningful head start.
Seedling stage in Canadian climates: what changes
Canadian homes in winter run indoor RH as low as 20 to 35% once forced-air heating kicks in , well below the 65 to 70% seedlings need. This is the most common environmental variable that goes unchecked by first-time Canadian growers.
A humidity dome or a simple clear plastic bag over the seedling container solves this for weeks 1 and 2 at essentially zero cost. Remove it for 2 to 4 hours daily to allow fresh air exchange, then replace it until week 3 when the plant can better regulate its own transpiration.
For outdoor Canadian growers starting seeds in March or April for transplant, the same indoor seedling targets apply , but pay particular attention to temperature fluctuations near windows. Glass conducts cold overnight, and seedlings on a windowsill in Edmonton or Winnipeg in April can see 10 to 14°C temperature swings between noon and 3 AM, which slows root development significantly.
Seedling
Use dome, watch RH
Harden off
Night temp watch
Outdoor start
Monitor soil temp
Too late
Frost risk, avoid
For outdoor Canadian growers, Plant Hardiness Zones of Canada data and Environment and Climate Change Canada climate normals provide frost date benchmarks for every region , essential for timing your seedling start date so plants have a full season after transplant.
Growers in short-season zones (3, 5, covering most of the Prairies and parts of Northern Ontario and Québec) consistently do better starting autoflower seeds in Canada indoors in late April to early May and transplanting in late May once nighttime temps hold above 10°C.
Canadian climate adds one layer of complexity that growers in warmer countries don't face: dry winter air for indoor starts and cold spring nights for outdoor transitions. Both are fixable with a $15 humidity dome and a min/max thermometer , cheap insurance against losing a week of growth.
Common mistakes Canadian growers make in weeks 1, 3
Mistake 1: Watering on a fixed calendar schedule
Watering every day "because it's a seedling" is the fastest route to root rot. The correct trigger is medium dryness, not the clock. Check the top 1 cm with your finger before every single watering session in weeks 1, 3.
Mistake 2: Feeding nutrients in week 1 or 2
Seedlings in a quality starter mix have everything they need for 18 to 25 days. Introducing nutrients early , even at half-strength , creates salt buildup that harms fragile root hairs. Hold all nutrients until week 3 at the earliest, and only if the plant shows signs of deficiency.
Mistake 3: Zero airflow in the grow space
Still air in a humid grow space is the primary condition for damping off. A small USB fan on its lowest setting, oscillating gently, keeps the stem and soil surface dry enough to prevent fungal colonisation. Don't point it directly at the seedling , aim it at a wall for indirect circulation.
Mistake 4: Starting in too large a container
A 7 L or 11 L pot holds far more medium than a week-1 seedling root system can interact with. That dead zone of wet medium around the tiny root ball stays saturated indefinitely. Start seedlings in a 0.5 to 1 L solo cup or small starter pot, then transplant at week 3 (photoperiod) or into a final 7 to 11 L container (autoflower, one transplant only).
Mistake 5: Not checking water pH
Tap water across many Canadian municipalities runs pH 7.2 to 8.0, which locks out calcium and magnesium at the root zone even if your medium contains those elements. A basic pH pen (around $20 to $35 CAD) and pH down solution keeps every watering in the 6.0 to 6.5 sweet spot for soil.
After reviewing patterns across public Canadian grower forums and the support questions our team fields each spring, these five mistakes account for the vast majority of seedling failures. Eliminate them and your success rate in weeks 1, 3 increases dramatically regardless of which genetics you're running.
Ready to start a new round? Our full range of cannabis seeds available in Canada covers everything from beginner-friendly autoflowers to high-yielding photoperiod feminized strains suited to every province.
Frequently Asked Questions: Cannabis Seedling Stage
How many hours of light do cannabis seedlings need?
What PPFD should I use for seedlings?
How often should I water cannabis seedlings?
What temperature do cannabis seedlings need?
What humidity level do cannabis seedlings need?
Why are my cannabis seedling leaves drooping?
What is damping off in cannabis seedlings?
When should I start feeding nutrients to seedlings?
Why is my cannabis seedling stretching so tall?
Can I start cannabis seeds outdoors in Canada?
Why did my seedling stop growing after sprouting?
Should I use a humidity dome for cannabis seedlings?
What pH should I water cannabis seedlings at?
How big should a cannabis seedling be at week 3?
My seedling has brown leaf tips , what's wrong?
Start with genetics built to survive the seedling stage
Vigorous germination and strong early root development start with the seed. Browse our full collection of cannabis seeds available across Canada, including beginner-friendly autoflowers and high-yielding feminized photoperiod strains.
Sources
Shop Premium Cannabis Seeds
Browse our curated selection of cannabis seeds, carefully chosen for Canadian growers. Fast shipping, germination guarantee, and discreet packaging across Canada.
Explore more seed categories: